Design of spur gear.
What Is a Gear ?
- † A gear is a toothed wheel which is used to transmit power and motion between machine parts.
- Gears are used in many applications like automobile engines, household appliances, industrial machine tools.
- When two gears of different sizes are meshed ,the larger is called “gear” while the smaller is “pinion”.
† Gear Tooth Terminology
Root Diameter : Diameter of root circle.
Pitch Diameter : Diameter of imaginary pitch circle specifying addendum and dedendum
Outside Diameter : Diameter of addendum (outside) circle .
Addendum : Radial distance from pitch to top of tooth .
Dedendum : Radial distance from pitch to bottom of tooth .
Circular Pitch : Distance on pitch circle from a point on one tooth to corresponding point on the adjacent tooth .
Tooth Thickness : Thickness of a tooth along the pitch circle .
Clearance : Distance between top of a tooth and bottom of mating space .
Working Depth : Distance a tooth projects into mating space .
Whole Depth: Total height of the tooth.
†
How To Draw a In-volute profile of the Spur Gear
The method of constructing an in-volute is illustrated as:-
These parameters are need for a in-volute gear drawing:
Diametrical Pitch (P),Tooth (N), 'Φ' Pressure Angle (PA) in-volute spur gear.
And we need to calculate the following:
- The Pitch Diameter (D) = N/P
- The Pitch Radius (R) = D/2 =
- The Base Circle Diameter (BD) = D * COS (PA)
- The Base Circle Radius (BR) = DB/2
- The Addendum ('a') = 1/P
- The Dedendum ('d') = 1.157/P
- Outside Diameter ('OD') = D+2*a
- Outside Radius ('OR') = .625" (R) + .0625" (a)
- Root Diameter ('RD') = D-2*d
- Root Radius ('RR') = .625" (R) - .0723" (d)"
For our method we need to compute the following as well:
- Circumference of the Base circle, (CB) = Pi * (DB)
- 1/20th of the Base Circle Radius, (FCB)
- Number of times that FCB can be divided into CB, (NCB)
- 360 degrees divided by NCB, (ACB)
- Gear Tooth Spacing (GT) = 360/T
- The 1/20th of the Base Circle Radius (FCB) is an arbitrary division, which yields a very close approximation; you can use whatever fraction you think will yield a good result. Now we have all our pertinent data, let's start drawing:-
- Open up your CAD program and draw concentric circles of the Pitch Diameter (D), Base Circle diameter (BD), Outside Diameter (OD), and Root Diameter (RD). Add a circle of any diameter for the bore of the gear. Make sure the circle centers are at origin.
- 1) Draw a line from the circle center to the base circle perpendicular to your grid. In other words at 0, 90, 180 or 270 degrees. I chose 270 degrees.
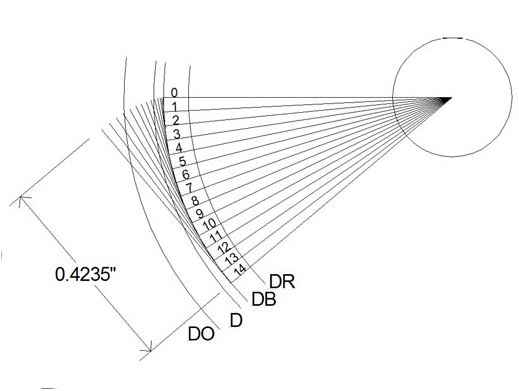
2) Draw a line 1/20th of the Base Circle Radius (BR) long (FCB) at a right angle from the end of that line. This line is now tangent to the base circle. It will be very hard to see unless you zoom in on the intersection of the base circle and the lines.
3) Radially copy the two lines (center ), make 14 copies at 2.86 degrees apart (ACB), for a total of 15 line pairs. Depending on the diameter of the gear you may need more or less lines, smaller gears need more, larger gears may need a smaller fraction of RB (base circle radius).
4) Number each set of lines, starting with 0 for the first one, going to 14
Drawing shows the two lines, and the copies of the line laid out and numbered.
- Extend the tangent line for each copy so it's length is the 1/20th of the base circle radius (FCB) times the number that you have next to that tangent line (0 x FCB, 1 x FCB, 2 x FCB…14 x FCB) extend them from the tangent point. Most CAD programs will make this very easy, providing that you started the line from tangent point, usually you just change the length parameter for each line, in Auto sketch there is a display showing the line data and retyping the length extends the line from its start point. Make sure you zoom in on the drawing so you extend the correct line.
Drawing shows the tangent lines extended, and the length of tangent #14, which is .4235" or FCB x 14
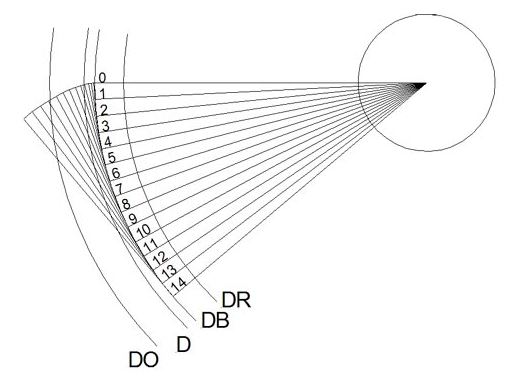
- Starting at tangent line #0, draw a line from the end of tangent #0 to then end of tangent #1, from the end of tangent #1 to tangent #2, tangent #2 to tangent #3 and so on. You should now have a very close approximation of the in-volute curve starting at the base circle and extending past the addendum circle. Trim the in-volute curve to DO, the outside diameter of the gear.
Drawing shows the in-volute drawn along the ends of the tangent lines.
- 1)Erase all the tangent lines, leaving the in-volute curve generated by the process. Make a line that goes from the intersection of the in-volute curve and the pitch diameter circle (D) to the center of the gear. Note that this will not be the same as the line going from the start of the in-volute at the base circle (BD) to the center.
2) Draw a second line ¼ of the Gear tooth spacing (GT) radially from the first line; usually this is best accomplished by radially copying the line from the first. 4.5 degrees is ¼ of the gear tooth spacing (GT=18 degrees).
3) Now mirror a copy of the in-volute curve around this second line, make sure you leave the original curve, thus copying the other side of the in-volute 9 degrees (1/2 GT) from the pitch circle (D) intersection with the in-volute.
Drawing shows steps 1 - 3
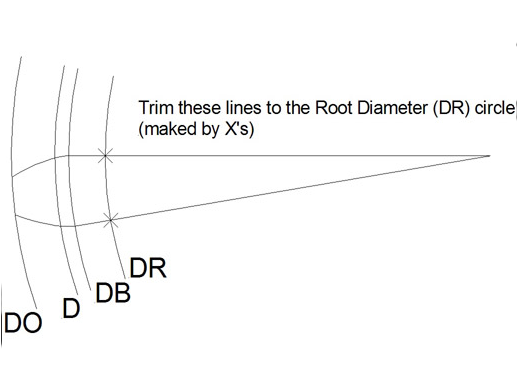
- Erase the radial lines, leaving the two in-volute curves. Draw a line from the start of each in-volute at the base circle to the center of the gear. Trim those lines to the Root Diameter (RD) circle.
- 1)Erase all the circles except the Root Diameter (RD) circle. Draw a curve from the outside tip of one in-volute to the other, which has a center at 0,0 (the center of the gear) thus drawing the outside of the tooth (the curve has the radius of OR). You now have a completed gear tooth.
2) Radially copy the completed gear tooth 19 times around the Root Diameter (RD) circle, spacing the copies 18 degrees apart (GT), making 20 gear teeth (T) in total.
3) Erase the Root Diameter (RD) circle and make a curve (or straight line) between ends of two teeth which has a center at 0,0 (the center of the gear). Purists will note that I have omitted the small fillet generally drawn at the bottom of the root. I did not draw it because I will be milling this gear on my CNC milling machine and the end mill will provide a fillet automatically.
4) Radially copy that curve or line around the gear as you did with the gear teeth. You now have a completed in-volute gear.


Comments
Post a Comment